Getting Started with Room Database in Android
A Comprehensive Guide to Implementing Room Database

Introduction:
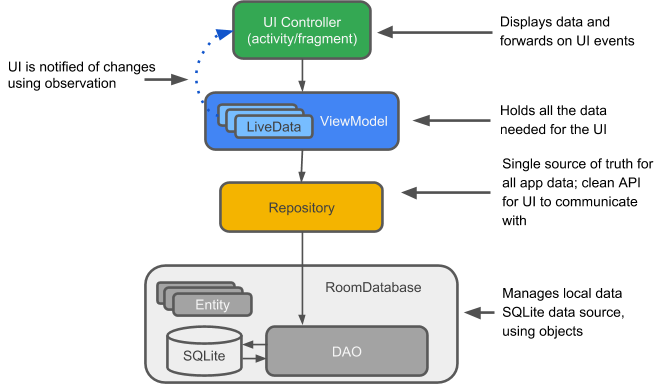
Local data storage is crucial for many Android applications, allowing them to store and retrieve data efficiently. In this guide, we will explore Room, a powerful library that simplifies database management in Android apps. We’ll cover everything from setting up Room to performing database operations and handling migrations.
Section 1: Setting Up Room Database
Step 1: Add Dependencies
Open your app’s `build.gradle` module level file and add the necessary dependencies for Room and Kotlin Coroutines (for asynchronous operations):
gradle
dependencies {
 def roomVersion = "2.4.0" // Check for the latest version
 implementation "androidx.room:room-runtime:$roomVersion"
 kapt "androidx.room:room-compiler:$roomVersion"
 implementation "androidx.room:room-ktx:$roomVersion"
 implementation "org.jetbrains.kotlinx:kotlinx-coroutines-android:1.5.2" // Add Coroutine dependency
}
OR
For latest android and jetpack compose if its failing with some error we might have to add ksp() {Kotlin symbol processing}.
Add below dependencies and plugin in build.gradle(Module level).
plugins {
 .
 .
 id "com.google.devtools.ksp"
}

.
.
.

dependencies{
  // Room dependency
    val room_version = "2.5.2"

    implementation("androidx.room:room-ktx:$room_version")
    // To use Kotlin annotation processing tool (kapt)
    ksp("androidx.room:room-compiler:$room_version")
}
Add below class path for the ksp in build.gradle(app level).
plugins {
    id "com.google.devtools.ksp" version "1.8.10-1.0.9" apply false
}
Step 2: Create Entity Class
Define your entity class with annotations to represent a table in the database. For example, let’s create a `User` entity(Basically consider it as a table in which each data member are column name):
import androidx.room.Entity
import androidx.room.PrimaryKey

@Entity(tableName = "users")
data class User(
 @PrimaryKey(autoGenerate = true) val id: Long = 0,
 val username: String,
 val email: String
)
Step 3: Create DAO (Data Access Object) Interface
Create a DAO interface for defining the database operations. For instance, let’s create a `UserDao`:
import androidx.room.Dao
import androidx.room.Insert
import androidx.room.OnConflictStrategy
import androidx.room.Query

@Dao
interface UserDao {

 @Insert(onConflict = OnConflictStrategy.REPLACE)
 suspend fun insertUser(user: User)

@Query("SELECT * FROM users")
 suspend fun getAllUsers(): List<User>
}
Step 4: Define Database Class
Create an abstract class that extends `RoomDatabase` to define the database instance and include the entities and DAOs:
import androidx.room.Database
import androidx.room.RoomDatabase

@Database(entities = [User::class], version = 1)
abstract class AppDatabase : RoomDatabase() {
 abstract fun userDao(): UserDao
}
Step 5: Initialise Database Instance
In your `Application` class or a relevant entry point, initialize the Room database instance:
import android.app.Application
import androidx.room.Room

class MyApp : Application() {

 companion object {
 lateinit var database: AppDatabase
 }

override fun onCreate() {
 super.onCreate()
 database = Room.databaseBuilder(
 applicationContext,
 AppDatabase::class.java,
 "my_database"
 ).build()
 }
}
Section 2: Performing Database Operations
Step 1: Insert Data
To insert a user into the database, you can use the `insertUser` method defined in the `UserDao`:
val newUser = User(username = "JohnDoe", email = "john@example.com")
MyApp.database.userDao().insertUser(newUser)
Step 2: Retrieve Data
To retrieve all users from the database, use the `getAllUsers` method from the `UserDao`:
val userList: List<User> = MyApp.database.userDao().getAllUsers()Please check the demo project for setting up the injectable room database object.
Link to demo project: https://github.com/raikwaramit/RoomDatabaseModule/
Conclusion:
Implementing a Room Database in your Android app can significantly simplify your data storage needs. With its intuitive setup and powerful features, you can efficiently manage your app’s local data. By following this guide, you’ve learned how to set up Room, define entities and DAOs, perform database operations, and handle migrations.
This guide covered the basics of Room. As you become more comfortable with the library, you can explore its advanced features, such as database relationships, LiveData integration, and complex queries.
With Room, managing local data in your Android app has never been easier. Happy coding!
